Double-Wishbone#
This notebook walks through loading a DARTS Model file of a Double Wishbone multibody. Additionally, it demonstrates how to enforce loop constraints in the graph multibody.
Requirements:
In this tutorial we will:
Import the multibody
Setup constraint kinematics
Setup the kdFlex Scene
Run the simulation with loop constraints
Run the simulation without constraints
Clean up the simulation
For a more in-depth descriptions of kdflex concepts see usage.
import atexit
from Karana.Frame import FrameContainer
from Karana.Dynamics.SOADyn_types import MultibodyDS
from Karana.Core import discard, allFinalized
Import the Multibody#
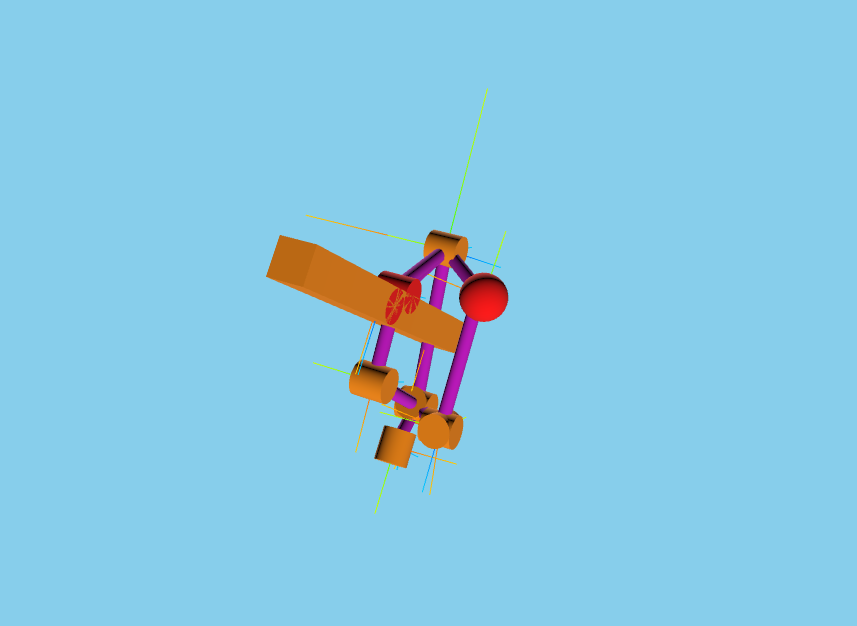
The double wishbone model has already been prepared as a SOADyn_types.MultibodyDS and saved to an H5 file. We can use this file to populate our Multibody. We then perform basic initialization and log the model to verify.
# load our DARTS model into a multibody
fc = FrameContainer("root")
mbody_ds = MultibodyDS.fromFile("../resources/double_wishbone/rigid_double_wishbone.h5")
mb = mbody_ds.toMultibody(fc)
del mbody_ds

# finalize and verify our multibody
mb.ensureCurrent()
mb.resetData()
assert allFinalized()

# dump tree structure
mb.dumpTree()
|-mb_MBVROOT_
   |-chassis    [<--- lc/PIN <--- upper_control_arm],  [---> lc/BALL ---> tie_rod],  [---> lc/PIN ---> shock_absorber_upper]
      |-lower_control_arm
         |-shock_absorber_lower
            |-shock_absorber_upper    [<--- lc/PIN <--- chassis]
         |-spindle
            |-spindleAlt
               |-tie_rod    [<--- lc/BALL <--- chassis]
               |-wheel
            |-upper_control_arm    [---> lc/PIN ---> chassis]
# show model details
mb.displayModel()
      Body                   Parent                  Hinge   Dofs
      ____                   ______                  _____   ____
   1. chassis                mb_MBVROOT_             LOCKED  0
   2. lower_control_arm      chassis                  PIN    1
   3. shock_absorber_lower   lower_control_arm        PIN    1
   4. shock_absorber_upper   shock_absorber_lower    SLIDER  1
   5. spindle                lower_control_arm        PIN    1
   6. spindleAlt             spindle                  PIN    1
   7. tie_rod                spindleAlt              UJOINT  2
   8. wheel                  spindleAlt               PIN    1
   9. upper_control_arm      spindle                  PIN    1
                                                             ____
                                                             9

 Nodes
 ---
 spindleAlt_ik_ref_node <{py:class}`Karana.Dynamics.Node`>  body=spindleAlt
 WheelContactNode <{py:class}`Karana.Dynamics.Node`>  body=wheel force=true
 chassis_shock_absorber_constraint_node <{py:class}`Karana.Dynamics.ConstraintNode`>  body=chassis
 chassis_tie_rod_constraint_node <{py:class}`Karana.Dynamics.ConstraintNode`>  body=chassis
 chassis_upper_control_arm_constraint_node <{py:class}`Karana.Dynamics.ConstraintNode`>  body=chassis
 shock_absorber_chassis_constraint_node <{py:class}`Karana.Dynamics.ConstraintNode`>  body=shock_absorber_upper
 tie_rod_chassis_constraint_node <{py:class}`Karana.Dynamics.ConstraintNode`>  body=tie_rod
 upper_control_arm_chassis_constraint_node <{py:class}`Karana.Dynamics.ConstraintNode`>  body=upper_control_arm

 Enabled loop constraints
 ---------------
 chassis_shock_absorber_constraint <PIN>  source=chassis_shock_absorber_constraint_node   target=shock_absorber_chassis_constraint_node
 chassis_tie_rod_constraint <BALL>  source=chassis_tie_rod_constraint_node   target=tie_rod_chassis_constraint_node
 chassis_upper_control_arm_constraint <PIN>  source=upper_control_arm_chassis_constraint_node   target=chassis_upper_control_arm_constraint_node
Setup Constraint Kinematics#
To use constraint kinematics, we use Karana.Dynamics.Multibody.cks() to get an instance of Karana.Dynamics.ConstraintKinematicsSolver. Then, Karana.Dynamics.ConstraintKinematicsSolver.solveQ() can solve for the coordinates to satisfy loop constraints and return the residual error.
solver = mb.cks()
error = solver.solveQ()
assert error < 1e-10
Setup the kdFlex Scene#
Next we setup kdflex’s graphics by calling the setupGraphics helper method on the multibody. This method takes care of setting up the graphics environment. We use Karana.Dynamics.Multibody.createStickParts() to add automatically add visual geometries.
See Visualization and SceneLayer for more information relating to this section.
# setup graphics and add visual stick parts
cleanup_graphics, web_scene = mb.setupGraphics(port=0, axes=0.5)
mb.createStickParts()
[WebUI] Listening at http://newton:39103
Run the Simulation With Loop Constraints#
We can now articulate through the lower control arm’s subhinge and demonstrate how loop constraints are enforced on the subhinge.
# grab the lower arm subhinge and enforce the loop constraints in it
lca = mb.getBody("lower_control_arm")
lca_shg = lca.parentHinge().subhinge(0)
mb.articulateSubhinge(lca_shg, 0)
Run the Simulation Without Constraints#
Compare this to when we articulate the bodies without enforcing loop constraints.
# this will not enforce the loop constraints
mb.articulateBodies()
Clean Up the Simulation#
Finally, we cleanup by deleting local variables, discarding our containers, multibodies, and cleaning up the scene.
# Cleanup
def cleanup():
    """Cleanup the simulation."""
    import gc

    global web_scene, solver, lca, lca_shg
    del solver, lca, lca_shg, web_scene
    gc.collect()
    cleanup_graphics()

    discard(mb)
    discard(fc)


atexit.register(cleanup)
<function __main__.cleanup()>
Summary#
By importing a model with built-in constraints, we can setup a ConstraintKinematicsSolver to enforce these constraints. Then, we compare the outputs from running the simulation with and without constraints.
Further Reeadings#
Load a mars 2020 rover urdf
Load a robotic arm urdf
Create and use constraints in a slider-crank model
Drive an ATRVjr rover